

Now that you’ve worked through the basic WordPress settings, let’s take a look at Plugins.
A plugin is a piece of software that adds a feature or function to WordPress.
Think of WordPress as the basic framework for your website. Plugins let you add things WordPress doesn’t necessarily do on its own — contact forms, backups, security features and all kinds of other tools.
Plugins can be extremely useful, but that doesn’t mean you need a plugin for everything.
In fact, one of the first things we’re going to do is get rid of a bunch of them.
Take a Look at Your Installed Plugins
From your WordPress dashboard, click Plugins → Installed Plugins.

If you installed WordPress through Softaculous like we did, you may be surprised by what you see.
Our brand-new practice website started with about 20 plugins already installed.
We certainly didn’t choose 20 plugins.
Some hosting and WordPress installation systems include additional plugins during installation. Yours may not look exactly like mine, and that’s okay.
The important thing is that you don’t need to keep every plugin simply because it was installed for you.
Active and Inactive Plugins
Before we start cleaning things up, notice that WordPress plugins can be either active or inactive.
An active plugin is currently running on your website.
An inactive plugin is installed, but it isn’t currently running.
You can tell which is which by looking underneath the plugin’s name:
- If you see Deactivate, the plugin is active.
- If you see Activate, the plugin is inactive.
You’ll also notice that WordPress won’t give you a Delete option for an active plugin. Normally, you deactivate a plugin first and then delete it.
Do We Need All of These?
No.
We’re going to start with a much smaller plugin list and add other plugins later when we actually need them.
For this website, we’re keeping:
- Backuply — for website backups.
- Loginizer — to help protect the WordPress login from repeated login attempts.
We’ll also install two plugins ourselves:
- Classic Editor — this is the editor we’ll use throughout Website Guide 101.
- WPForms Lite — we’ll use this later to create a contact form.
Don’t Collect Plugins
Plugins are useful, but more isn’t necessarily better.
Every plugin adds something else to your WordPress installation that may need updates, maintenance or troubleshooting later.
A good habit is simple: install a plugin because you need it — not just because it’s available.
Clean Up the Plugins You Don’t Need
First, we’re going to remove the extra plugins that came with our WordPress installation.
Your plugin list may be different from mine, so don’t worry if you don’t see exactly the same names.
Watch for Free and Pro Versions
You may see both a regular version and a Pro version of the same plugin.
Some Pro plugins depend on their regular version, so don’t start randomly deleting pieces of a plugin pair.
If you’re removing both versions, deactivate the Pro version first, then remove the Pro version before removing the regular version.
To remove plugins you don’t need:
- Check the box beside the plugins you want to remove.
- Open the Bulk actions menu.
- Select Deactivate.
- Click Apply.
Once the plugins are inactive, select the ones you want to remove again.
- Open Bulk actions.
- Select Delete.
- Click Apply.

WordPress may ask you to confirm that you want to delete them. Confirm the deletion.
A Much Cleaner Plugin List
After removing the extras, our plugin list is considerably less intimidating.

For now, we’re keeping Backuply and Loginizer.
We’ll deal with backups and security more thoroughly later. Right now, our goal is simply to clean up the new WordPress installation and get the basic tools in place.
Install Classic Editor
Next, we’re going to install Classic Editor.
WordPress has a newer block-based editor, but Website Guide 101 uses the Classic Editor. That gives us a straightforward editing screen that works more like a traditional word processor and keeps the screens in this Guide consistent with what you’ll see on your own website.
From the WordPress dashboard, go to: Plugins → Add Plugin

In the search box, type: Classic Editor
Find Classic Editor by the WordPress Contributors.
Check Before You Install
Plugin names can be very similar. Before installing a plugin, check the name and developer so you know you’re installing the one you intended to use.
Click Install Now.
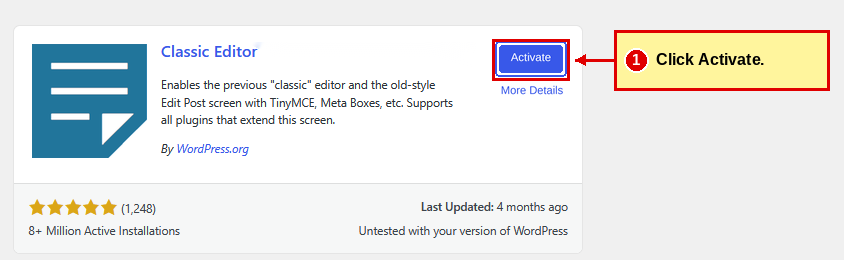
When installation is complete, the button will change to Activate.
Click Activate.
Install Classic Widgets
Classic Editor takes care of your pages and posts, but it doesn’t change the Widgets screen. Without one more plugin, WordPress will still use blocks to manage your sidebar and footer areas.
Classic Widgets brings back the simpler widget screen we’ll use later in this Guide.
Go to: Plugins → Add Plugin

In the search box, type: Classic Widgets
Find Classic Widgets. On the search screen, the developer is listed as Tonya Mork. Once it’s installed, your plugin list will show it as by WordPress Contributors. It’s the same plugin.
Not the Look-Alike
You may also see a plugin called Classic Editor and Classic Widgets by a different developer. That’s not the one we’re using. Install Classic Widgets on its own.
Click Install Now.
When installation is complete, click Activate.

Classic Widgets doesn’t have a settings screen. Once it’s active, it simply does its job.
Classic Editor is now installed and active.
Install WPForms Lite
We’re going to install one more plugin while we’re here: WPForms Lite.
We’ll use WPForms later to create the form visitors can use to contact you through your website.
Go to: Plugins → Add Plugin
Search for: WPForms

Look for WPForms Lite.
Click Install Now.
When installation finishes, return to Plugins → Installed Plugins if necessary.
You should see WPForms Lite in your plugin list.
Click Activate.

WPForms Opens a Welcome Screen
This activation is a little different from the Classic Editor.
After you activate WPForms, it may take you directly to a Welcome to WPForms screen.

You’ll see options to start creating a form and may be offered a Setup Wizard.
You don’t need to do any of that yet.
Right now, we only wanted to install and activate WPForms.
We’ll come back to WPForms in a later chapter when we build your Contact page. At that point, we’ll create and set up the actual contact form together.
For now, click Plugins → Installed Plugins in the left-hand menu to return to your plugin list.
That’s All You Need to Begin
Your plugin list should now be much shorter than the one you started with.

For our website, we’re starting with:
- Backuply
- Classic Editor
- Loginizer
- WPForms Lite
That’s enough for now.
As we continue building the website, we may need additional plugins. When we do, we’ll add them for a specific reason and learn what they do before piling anything else onto WordPress.
What About Plugin Updates?
Plugins don’t stay frozen in time. Their developers release updates to fix problems, improve features, maintain compatibility with WordPress and sometimes address security issues.
When an update is available, WordPress will let you know.
You’ll also notice an Enable auto-updates option beside plugins on the Installed Plugins screen.
For now, we’re going to leave automatic updates alone. We’ll talk about updates, backups and ongoing website maintenance later, after your website is built.
One Rule to Remember
Don’t ignore plugin updates forever.
Plugins are part of your website, and keeping them maintained is part of taking care of your website.
Plugins — Done!
You now know how to:
- Recognize active and inactive plugins.
- Deactivate plugins.
- Delete plugins you don’t need.
- Add a new plugin.
- Activate a plugin.
- Recognize when a plugin sends you to its own setup screen.
- Keep your plugin list limited to tools you actually need.
Next, we’ll move from Plugins to Themes — the part of WordPress that controls the basic look and layout of your website.
Prefer the Down & Dirty Version? Step 7: Plugins
Our illustrated Down & Dirty guide walks you through cleaning up and installing your plugins with numbered instructions, screenshots and checkboxes.
← Previous |
Chapter 7 | Next → |
