

Media Settings: Managing Your Website’s Pictures
In your WordPress dashboard, click Settings → Media.
Pictures make a website more interesting. Whether you’re showing off your products, introducing your employees or displaying examples of your work, you’ll probably upload quite a few images as you build your website.
WordPress has a built-in Media Library where it stores your uploaded pictures and other media files. But before we start uploading anything, let’s take a look at how WordPress handles image sizes.
Why Does WordPress Create Different Image Sizes?
When you upload a picture, WordPress usually keeps the original image and creates several smaller versions of it.
Why? Because you don’t need an enormous photograph every time you want to display a small picture on your website.
For example, Joe’s Auto Repair might upload a photograph of its shop. That same picture could appear as a small thumbnail in a gallery, a medium-sized image on the About page or a larger photograph on the homepage.
WordPress can create different sizes of that photograph so your theme can use the appropriate version.
Thumbnail Size
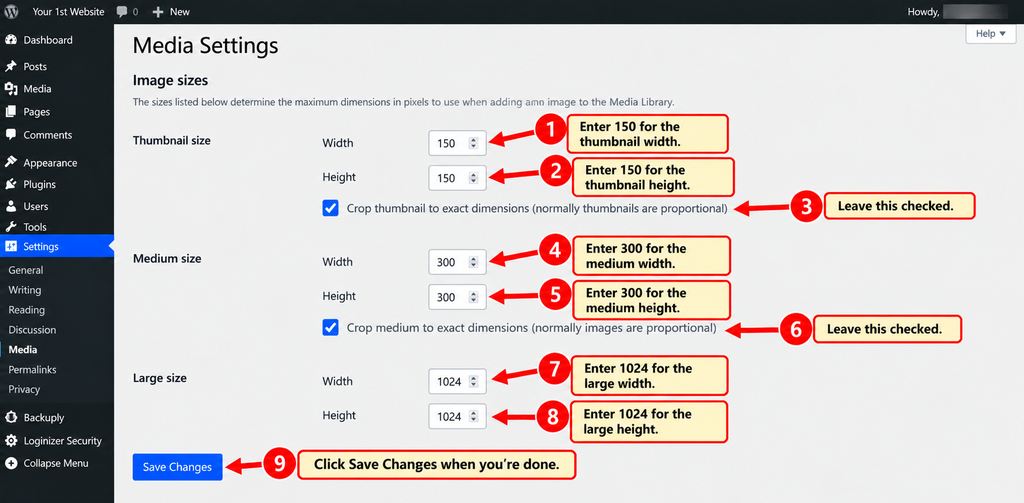
The first setting controls your thumbnails. These are small versions of your pictures, often used in galleries, image grids and other places where several pictures appear together.
The default thumbnail size is generally 150 × 150 pixels.
You’ll also see an option labeled Crop thumbnail to exact dimensions.
If you check this box, WordPress crops thumbnails to the specified dimensions instead of simply shrinking the entire picture. This can make a gallery look more uniform, but parts of some pictures may be cut off.
For now, leave the thumbnail settings at their defaults.
Medium Size
The next section controls medium-sized images.
The default maximum dimensions are generally 300 × 300 pixels.
That doesn’t mean every medium image becomes a square. WordPress normally maintains the picture’s proportions and fits it within the maximum width and height.
A medium-sized image might work well beside a paragraph of text or in a smaller content area.
Large Size
Large images are useful when you want a photograph to occupy more space on a page.
The default maximum dimensions are generally 1024 × 1024 pixels.
Again, WordPress normally preserves the picture’s proportions rather than stretching or squeezing it into a square.
Your theme may also create additional image sizes for particular layouts.
Should You Change These Sizes?
For our first website, leave all three image-size settings at their defaults.
They work well as a starting point, and there’s no reason to complicate things before we know how our pictures will look with our chosen theme.
One thing worth knowing: changing these settings later generally affects newly uploaded images. It doesn’t automatically recreate all the different sizes of pictures you’ve already uploaded.
Uploading Files: Organizing Your Pictures
Near the bottom of Media Settings, you’ll find a checkbox labeled Organize my uploads into month- and year-based folders.
When this is checked, WordPress automatically organizes your uploaded files into folders according to the year and month they were uploaded.
For example, a picture uploaded in September 2026 might be stored in a folder such as:
wp-content/uploads/2026/09/
You don’t have to create these folders yourself. WordPress handles that automatically.
I recommend leaving this option checked. It’s a convenient way to keep uploaded files organized behind the scenes.
What About the Media Library?
Now that you understand the settings, let’s take a quick look at where your pictures will actually appear.
In the left-hand menu, click Media → Library.
This is where WordPress displays your uploaded pictures and other media files. You can view them, edit certain details and find files you’ve already uploaded.
When we begin creating your pages, I’ll show you how to upload pictures, add alternative text, insert images into your content and choose the appropriate image size.
For now, there’s nothing you need to upload.
Save Your Changes
If you’ve left everything at its default settings, there’s nothing to save.
If you made any changes, click Save Changes at the bottom of the page.
And that’s Media Settings finished!
Quick Tip: Bigger Pictures Aren’t Always Better
A photograph straight from your phone can be several megabytes in size. Uploading lots of enormous pictures can slow down your website, especially for visitors using mobile devices.
Before uploading pictures, resize or compress unusually large files when appropriate. We’ll cover preparing images for your website when we start building your pages.
Want the Down & Dirty Version? Step 6 WordPress – Settings
| ← Previous Chapter 7 Settings → Discussion |
Website Guide 101 Chapter 7 Settings → Media |
Next → Chapter 7 Settings → Permalinks |
