
 Your pages are built. Now your visitors need a way to get to them. That’s the job of your menu, the row of links across the top of every page.
Right now WordPress is making its best guess. Until you build a menu yourself, it simply lists every page you’ve created, in whatever order it likes, including the Sample Page nobody needs to see.

Plan Your Menu First
Think about how a customer walks through your site. Most people want to know who you are, what you do, and how to reach you. Put the most important pages first and keep the menu short. Five to seven items is plenty.
For Joe’s Auto Repair, the order is Home, About, Services, Gallery, FAQs and Contact. Contact goes last because that’s where people naturally look for it.
Creating Your Menu
In your dashboard, go to Appearance → Menus. The first time you open it, WordPress pre-fills a menu with every page on your site. That’s a handy start, but you’ll want to tidy it up.
- Remove any pages you don’t want in the menu by clicking the little arrow on the right of each item and choosing Remove. Keep Home.
- Give your menu a name. Only you will see it, so something simple like “Main Menu” is fine.
- In the Pages box on the left, check the pages you want and click Add to Menu, then click Create Menu.
- Drag the items up or down until they’re in the order you planned.
- Under Menu Settings, check Primary Menu. This tells your theme where to show it.
- Click Save Menu.
Leave “Automatically add new top-level pages” unchecked. That way you decide what goes in your menu, not WordPress.
Adding a Dropdown
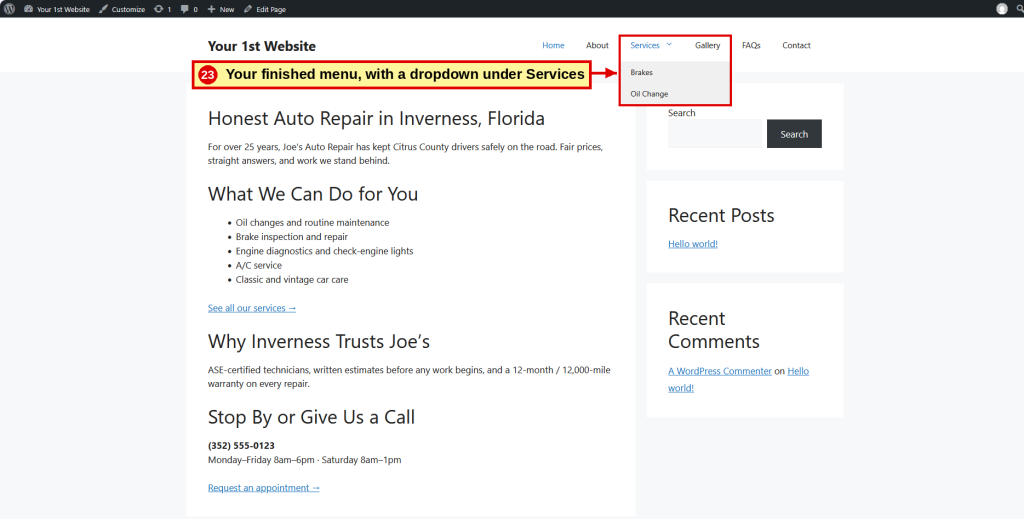
Sometimes a page has its own smaller pages underneath it. Joe has separate pages for Brakes and Oil Change, and they belong under Services. These are called child pages, and they can appear as a dropdown when someone hovers over Services.
First, tell WordPress which page they belong to. Edit each child page, find Page Attributes on the right, set Parent to Services, and click Update.
Then go back to Appearance → Menus, check the child pages, and click Add to Menu. Drag each one so it sits just below Services and nudge it slightly to the right. When it’s nested correctly, WordPress labels it “sub item.” Click Save Menu.

Check Your Work
Visit your site and look at the top of the page. Your menu should be in the order you chose, and hovering over Services should show the dropdown. Click every link to make sure each one goes where it should.
What About the Sample Page?
Leaving a page out of your menu doesn’t delete it. The Sample Page is still on your site, just hidden from the menu. We’ll remove it for good in Finishing Touches.
Prefer the Down & Dirty Version? Step 14: Menus
Our illustrated Down & Dirty guide walks you through building your menu and dropdown with numbered instructions, screenshots and checkboxes.
Coming Up: Widgets
Next we’ll look at the sidebar on the right side of your pages and decide what belongs there, and what doesn’t.
| ← Previous | Chapter 11 | Next → |
