

Your pages are built and your menu is in place. Now let’s look at Widgets.
A widget is a small block of content that sits outside your page content: in the sidebar beside your pages, or in the footer at the bottom of every page.
Because widgets show up on every page, they’re a good place for things visitors should always be able to find, like your business hours.
Classic Widgets
Back in Chapter 7, we installed the Classic Widgets plugin. That’s why your Widgets screen looks like the one in this chapter. Without it, WordPress uses its block-based widget screen instead.
Open the Widgets Screen
From your WordPress dashboard, go to: Appearance → Widgets

The screen is split into two parts:
- Available Widgets on the left. These are all the widgets you can use.
- Widget areas on the right. These are the places in your theme’s layout where widgets can go.
Widget Areas
GeneratePress gives you these widget areas:
| Right Sidebar | The column beside your page content. |
| Left Sidebar | Only shows if your layout uses a left sidebar. |
| Header | Inside the header, beside your site title or logo. |
| Footer Widget 1–5 | Columns near the bottom of the page. The Customizer sets how many show. |
| Footer Bar | The bottom strip with the copyright line. |
| Top Bar | A thin strip above the header. It only appears once it has a widget. |
For our website, we’ll use the Right Sidebar and Footer Widget 1.
Available Widgets
WordPress describes each widget in one line, right on the Widgets screen:
| Archives | A monthly archive of your site’s Posts. |
| Audio | Displays an audio player. |
| Block | A widget containing a block. |
| Calendar | A calendar of your site’s posts. |
| Categories | A list or dropdown of categories. |
| Custom HTML | Arbitrary HTML code. |
| Gallery | Displays an image gallery. |
| Image | Displays an image. |
| Meta | Login, RSS, & WordPress.org links. |
| Navigation Menu | Add a navigation menu to your sidebar. |
| Pages | A list of your site’s Pages. |
| Recent Comments | Your site’s most recent comments. |
| Recent Posts | Your site’s most recent Posts. |
| RSS | Entries from any RSS or Atom feed. |
| Search | A search form for your site. |
| Tag Cloud | A cloud of your most used tags. |
| Text | Arbitrary text. |
| Video | Displays a video from the media library or from YouTube, Vimeo, or another provider. |
| WPForms | Display a form. (Added by the WPForms plugin.) |
You won’t need most of these for a small-business website. The one you’ll use most is Text.
Posts vs. Pages
Archives, Calendar, Categories, Recent Posts and Tag Cloud are for Posts, which is the blog side of WordPress. Our website is built with Pages, so those widgets don’t have much to show.
Widgets You Already Have
Look at the Right Sidebar. WordPress already put three Block widgets there when it was installed: Search, Recent Posts and Recent Comments.
Here’s where they show up on your website:

Recent Posts only shows “Hello world!” and Recent Comments only shows the sample comment. Neither one does anything for a small business, so we’re going to remove them.
Remove a Widget
To remove a widget:
- Click the widget’s name bar to open it.
- Click Delete.
That’s it. The widget disappears from the widget area and from your website.
We deleted Recent Posts and Recent Comments, and kept Search.
Want to Keep the Settings?
At the bottom of the Widgets screen is an Inactive Widgets area. Drag a widget there instead of deleting it, and WordPress keeps its settings in case you want it back later.
Add a Widget
There are two ways to add a widget:
- Drag it from Available Widgets and drop it into a widget area.
- Click it, choose a widget area from the list that opens, and click Add Widget.
Either way, the widget opens so you can fill it in. When you’re done, click Save. The button changes to Saved.
We added a Pages widget to the Right Sidebar. It lists every page on your website automatically.

Notice “Sample Page”?
The Pages widget lists every page, including the Sample Page WordPress created during installation. If you don’t need it, go to Pages, hover over Sample Page and click Trash.
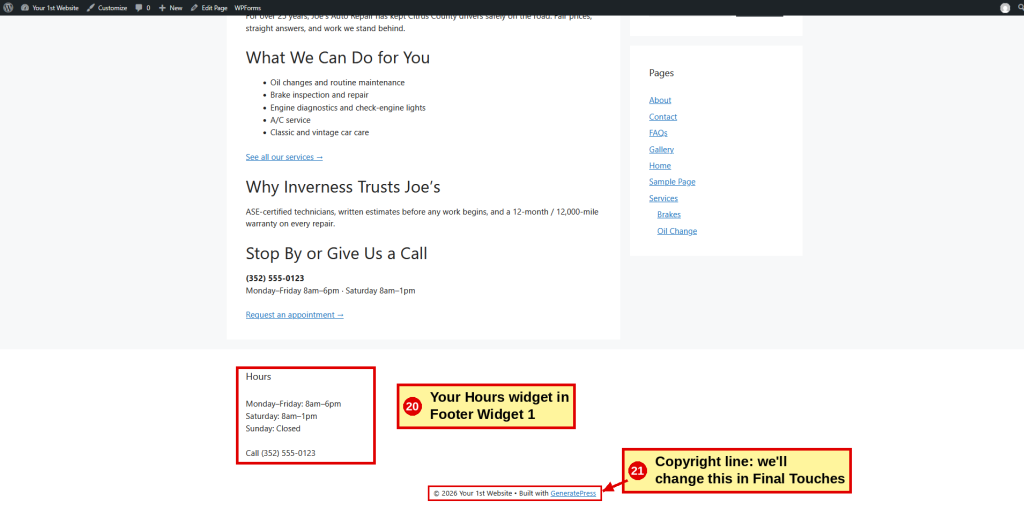
Add Your Hours to the Footer
Now for the widget your visitors will actually use: your business hours.
We dragged a Text widget into Footer Widget 1, typed Hours in the Title box, and typed the hours into the Visual tab, the same way you’d type in a word processor:
Monday–Friday: 8am–6pm
Saturday: 8am–1pm
Sunday: Closed
Call (352) 555-0123
Then we clicked Save.
Because it’s in the footer, your hours now show at the bottom of every page:
Edit or Move a Widget
To edit a widget, click its name bar to open it, make your changes and click Save.
To change the order within a widget area, drag the widget up or down. To move it to a different widget area, drag it there.
What About the Copyright Line?
The “© 2026 Your 1st Website • Built with GeneratePress” line at the very bottom isn’t a widget. We’ll change it in Final Touches.
Widgets — Done!
You now know how to:
- Find the Widgets screen.
- Recognize widget areas and available widgets.
- Remove widgets you don’t need.
- Add a widget by dragging or clicking.
- Put your business hours in the footer.
- Edit and move widgets.
Next, we’ll set up Email for your website.
Prefer the Down & Dirty Version? Step 15: Widgets
Our illustrated Down & Dirty guide walks you through your widgets with numbered instructions, screenshots and checkboxes.
← Previous |
Chapter 12 | Next → |
