
 Your Contact page may be the most important page on your website.
Every other page does its job by convincing a visitor that you’re the right business. The Contact page is where that visitor actually reaches out. If it’s confusing, or if their message disappears into thin air, all the work you put into the rest of your website is wasted.
So let’s make it easy for people to get in touch, and make sure their messages actually reach you.
Why Add a Form?
You might wonder why you need a form at all. Why not just list your phone number and email address?
You should list your phone number. Plenty of customers would rather call. But a form helps in a few ways a phone number can’t.
Not everyone wants to call. Some people are at work, some are shy, and some are thinking about your business at ten o’clock at night when you’re closed. A form lets them reach out right then, while they’re interested, instead of waiting until tomorrow and maybe forgetting.
A form also keeps your email address off your website. Email addresses posted on websites get collected by automated programs and flooded with junk. A form delivers messages to you without ever showing your address.
And a form makes sure you get the information you need. Name, email and what they want. No more guessing who left that voicemail.
A Contact Page Is More Than a Form
Before we build anything, remember that the form is only part of the page.
Above the form, add a sentence or two and the basics: your phone number, your hours, and your address or the area you serve. Something as simple as this works:
Have a question or want to schedule service? Call us at (352) 555-0123, or send us a message below and we’ll get back to you within one business day.
That last part matters. Telling people when they’ll hear back makes them much more comfortable hitting Send.
Creating Your Form
Remember WPForms Lite, the plugin you installed back in Chapter 7? This is what it’s for.
In your dashboard, go to WPForms → Add New Form. Give your form a name, something like Contact Form. Visitors won’t see this name. It’s just so you can find it later.
WPForms offers a long list of ready-made templates. Look for Simple Contact Form and click Use Template.

You may see a box in the corner called the WPForms Challenge, along with suggestions to upgrade. You can ignore them. Everything you need is in the free version.
Keep It Short
The Simple Contact Form already has three fields: Name, Email, and Comment or Message. For most small businesses, that’s all you need.
It’s tempting to add more. Phone number, address, how did you hear about us, preferred contact time. But every field you add is one more reason for a visitor to give up. If you really need a phone number, you can drag a Phone field onto the form. Otherwise, keep it simple. You can always ask for more information when you reply.
What Visitors See After They Click Submit
Under Settings → Confirmations, you’ll find the message visitors see after they send the form. The standard message works, but you can make it sound more like you:
Thanks for reaching out! We’ll get back to you within one business day. If it’s urgent, give us a call at (352) 555-0123.
The Most Important Setting
Here’s the setting most people never look at, and it’s the one that matters most.
Go to Settings → Notifications and look at Send To Email Address. This is where every message from your form will be delivered.
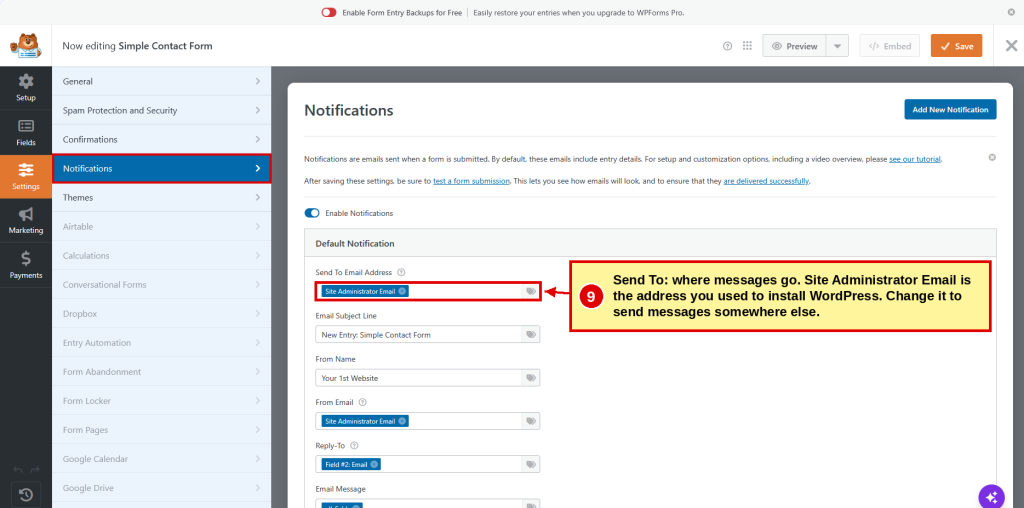
Out of the box, it says Site Administrator Email. That’s the email address you entered when you installed WordPress. If that’s an address you check every day, you’re all set.
If it isn’t, if it’s an old account or one you only use for logins, click the little x to remove it and type in the address where you actually want customer messages to go. A form that sends messages to an inbox nobody reads is worse than no form at all.
When you’re done, click Save in the top-right corner.
Putting the Form on Your Contact Page
Your form exists now, but it isn’t on your website yet. Let’s put it there.
Open your Contact page, click in the writing area below your opening sentence and contact details, then click the Add Form button above the toolbar. Choose your form and click Add Form.
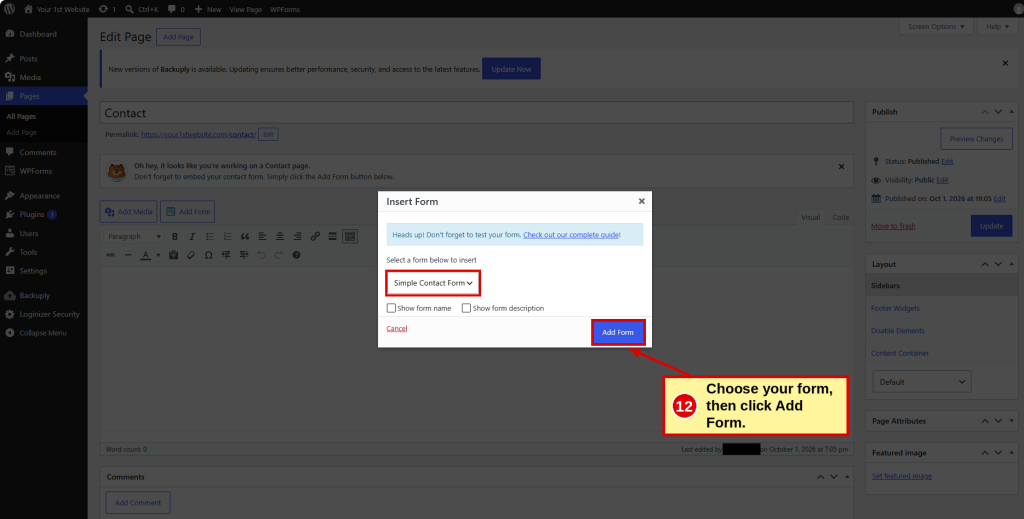
What appears on your page may surprise you. Instead of a form, you’ll see a short line of text that looks something like this:

Don’t worry. That’s not a mistake. It’s a shortcode, a little instruction that tells WordPress, “put form number 30 here.” Your visitors will never see it. They’ll see the real form.
Just don’t type inside it or delete part of it. If it gets messed up, delete the whole line and use the Add Form button again.
Click Update to save the page, then click View page.

There’s your form, ready for customers.
Now Test It
Please don’t skip this part.
Go to your Contact page the way a customer would, fill out the form with your own name and email, and click Submit. You should see your confirmation message. Then check the inbox you chose in Send To.
If the message arrived, wonderful. Your form works.
If it didn’t, check your spam or junk folder first. Messages sent from websites sometimes end up there, especially the first few times.
If it never arrives at all, don’t panic. Some web hosts and email providers are picky about messages that come from websites, and they quietly throw them away. It’s a common problem with a fix, and we’ll take care of it in Email Chapter. Until then, keep your phone number on the Contact page so customers always have a way to reach you.
One Last Thing
The best contact form in the world doesn’t help if nobody answers it.
When a message comes in, reply as quickly as you can. A customer who reaches out through your website is often contacting other businesses at the same time. The one who answers first frequently gets the job.
Prefer the Down & Dirty Version?
Step 12: Create Contact Page
Our illustrated Down & Dirty guide walks you through creating your contact form and adding it to your Contact page with numbered instructions, screenshots and checkboxes.
Coming Up: Images
Your Contact page is ready. Next, we’ll add pictures to your pages and build a photo gallery.
| ← Previous | Chapter 10 | Next → |
