

Before you start building your website, let’s get the basic WordPress settings squared away.
We’re going straight down the Settings menu. Most of the defaults are fine. I’ll tell you what to change, what to check and what to leave alone.
On This Page
Need a particular setting? Click it to jump straight there.
| General Settings | Writing Settings |
| Reading Settings | Discussion Settings |
| Media Settings | Permalink Settings |
| Privacy Settings | |
1. General Settings
From your WordPress dashboard, go to Settings → General.


Check these settings:
- ☐ Site Title: Enter your business or website name.
- ☐ Tagline: Enter a short description of your website.
- ☐ Site Icon: Add one if you already have it. Otherwise, skip it for now.
- ☐ WordPress Address (URL): Leave it alone.
- ☐ Site Address (URL): Leave it alone.
- ☐ Administration Email Address: Make sure this is an email address you check.
- ☐ Membership — Anyone can register: Leave unchecked.
- ☐ New User Default Role: Leave set to Subscriber.
- ☐ Site Language: Choose your language.
- ☐ Time Zone: Choose a city in your time zone.
- ☐ Date Format: Choose the format you prefer.
- ☐ Time Format: Choose the format you prefer.
- ☐ Week Starts On: Choose Sunday or Monday.
Click Save Changes.
Don’t Touch Those URLs
Unless you have a specific reason and know exactly what you’re doing, don’t change the WordPress Address or Site Address. An incorrect address can prevent you from reaching your website or dashboard.
Want to know more? Read Chapter 7: Inside WordPress → General Settings.
2. Writing Settings
Go to Settings → Writing.

- ☐ Default Post Category: Leave as Uncategorized for now.
- ☐ Default Post Format: Leave set to Standard.
If you have already installed the Classic Editor plugin:
- ☐ Default editor for all users: Select Classic Editor.
- ☐ Allow users to switch editors: Select No if you want to use Classic Editor throughout this Guide.
If you don’t see those choices yet, don’t worry. We’ll install Classic Editor when we work on plugins.
- ☐ Post via Email: Leave it alone.
- ☐ Update Services: Leave it alone.
If you made any changes, click Save Changes.
Want to know more? Read Chapter 7: Inside WordPress → Writing Settings.
3. Reading Settings
Go to Settings → Reading.

- ☐ Your homepage displays: Leave this alone for now. We haven’t built your homepage yet.
- ☐ Blog pages show at most: Leave the default.
- ☐ Syndication feeds: Leave the default.
- ☐ For each post in a feed: Leave the default.
- ☐ Discourage search engines from indexing this site: Leave it unchecked.
If you made a change, click Save Changes.
Want to know more? Read Chapter 7: Inside WordPress → Reading Settings.
4. Discussion Settings
Go to Settings → Discussion.

If you’re building a regular small-business website and don’t want visitors leaving public comments:
- ☐ Uncheck Attempt to notify any blogs linked to from the post.
- ☐ Uncheck Allow link notifications from other blogs (pingbacks and trackbacks).
- ☐ Uncheck Allow people to submit comments on new posts.
If you aren’t allowing comments, you don’t need to spend time setting up comment moderation.

Avatars

If you aren’t allowing comments:
☐ Uncheck Show Avatars.
Click Save Changes.
Comments Are Not Your Contact Form
Turning off comments doesn’t prevent customers from contacting you. We’ll create a private contact form when we build your Contact page.
Want to know more? Read Chapter 7: Inside WordPress → Discussion Settings.
5. Media Settings
Go to Settings → Media.
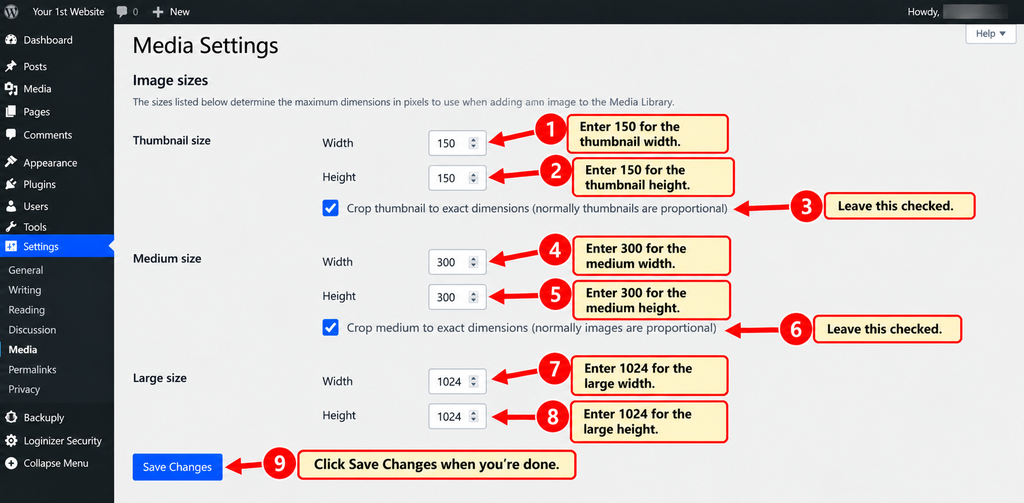
This one’s easy.
- ☐ Thumbnail size: Leave the default.
- ☐ Medium size: Leave the default.
- ☐ Large size: Leave the default.
- ☐ Organize my uploads into month- and year-based folders: Leave checked.
If you didn’t change anything, there’s nothing to save. Move on.
Want to know more? Read Chapter 7: Inside WordPress → Media Settings.
↑ Back to Top
6. Permalink Settings
Go to Settings → Permalinks.

We’re going to give your pages clean, readable addresses.
- ☐ Select Post name.
- ☐ Leave Category base blank.
- ☐ Leave Tag base blank.
- ☐ Click Save Changes.
Quick Tip
Choose your permalink structure now, before you start creating and publishing your website’s pages.
Want to know more? Read Chapter 7: Inside WordPress → Permalink Settings.
7. Privacy Settings
Go to Settings → Privacy.

We’re not writing your entire Privacy Policy right now. We’re making sure you have a page ready for it.
- ☐ Check whether WordPress already has a Privacy Policy page.
- ☐ If it does, keep it.
- ☐ If it doesn’t, create one from this screen.
- ☐ Make sure the correct page is selected as your Privacy Policy page.
- ☐ Leave the Privacy Policy as a draft until we’ve reviewed and customized it.
We’ll finish your Privacy Policy after we know which plugins, forms and other features your website will actually use.
Want to know more? Read Chapter 7: Inside WordPress → Privacy Settings.
WordPress Settings — Done!
Before you move on, make sure you’ve finished these:
- ☐ General Settings checked
- ☐ Writing Settings checked
- ☐ Reading Settings checked
- ☐ Discussion Settings checked
- ☐ Media Settings checked
- ☐ Permalinks set to Post name
- ☐ Privacy Policy page kept or created
- ☐ Search Engine Visibility choice remembered for launch
Want to Know More?
Read Chapter 7: Inside WordPress for the complete explanation of these settings and why you might choose something different.
← Step 5 Install WordPress |
Down & Dirty | Step 7 Plugins → |
