
 You’ve probably heard that a picture is worth a thousand words. On a website, it may be worth even more.
Before a visitor reads a single sentence, they’ve already looked at your pictures. In a second or two, they’ve formed an opinion about your business: whether it looks professional, whether it looks like the kind of place they want to do business with, and whether you do the kind of work they’re looking for.
That’s a lot of responsibility for a few photographs. So let’s talk about how to choose them, get them ready, and put them on your website.
Real Photos Beat Pretty Photos
There are websites full of beautiful, professional photographs you can use. Some are free. They can be useful, especially when you’re just getting started.
But a stock photo of a smiling mechanic isn’t Joe. A stock photo of a perfect wedding cake isn’t your bakery’s cake. Visitors can often tell, and even when they can’t, a stock photo doesn’t show them what you can do.
Whenever you can, use pictures of your actual business: your shop, your work, your products, your team, and you.
Your photos don’t need to be perfect. Today’s phones take very good pictures. A clear, well-lit photo of real work is worth more than a glossy picture of someone else’s.
A Word About Borrowing Pictures
It’s tempting to find a great picture on Google and use it. Don’t.
Most pictures you find online belong to someone, and using them without permission can get you a very unpleasant letter, or a bill. If you need a picture you didn’t take, use a site that offers free photos for business use, such as Pexels, Unsplash or Pixabay.
And if a photo shows your customers, get their permission first.
Get Your Photos Ready
This is the step most people skip, and it’s the one that slows their website down.
Make Them Smaller
The photo straight from your camera or phone is huge, often 4,000 to 6,000 pixels wide and several megabytes in size. That’s great for printing a poster. It’s far more than a website needs.
Your visitors’ phones have to download every picture on your page. Big pictures mean slow pages, and slow pages mean visitors who give up and leave.
For most websites, a photo about 1,600 pixels wide and 300 KB or less looks great and loads quickly. For example, the eight vintage car photos used in this guide started at 22 megabytes. After resizing, all eight together were about 2 megabytes, and they look exactly the same on screen.
Most photo programs can resize a picture. On Windows, the Photos app can do it. On a Mac, Preview can.
Give Them Real Names
Your camera names pictures things like IMG_4472.jpg. That doesn’t tell anyone anything.
Before you upload, rename each photo to describe what’s in it: white-vw-beetle-engine-repair.jpg or chocolate-wedding-cake.jpg. Use lowercase letters and put dashes between the words.
Search engines read those names. It’s a small thing that helps people find your business.
Adding a Single Picture to a Page
Most of the time, you’ll add one picture at a time: a photo of you on your About page, or a picture of your work on your Services page.
Click in the writing area where you want the picture to go, then click Add Media. From there, you can upload a new photo or choose one you’ve already uploaded.

Before you click Insert into page, look at the right side of the window. There are a few settings worth knowing about.
Alt Text
Alt Text is a short description of what’s in the picture, such as Mechanic working under a white VW Beetle.
It has two jobs. People who can’t see well often use programs that read websites out loud, and those programs read the Alt Text so they know what’s in the picture. And search engines read it to understand your page.
You don’t need a paragraph. Describe the picture the way you would to someone on the phone.
Alignment and Size
Alignment decides where the picture sits. Left or Right lets your words wrap around it. Center puts it in the middle with words above and below.
Size decides how big it appears. Medium works well next to text. Large works well when the picture should stand on its own.
Don’t worry about getting these perfect. You can click the picture later and change them.
Building a Gallery
Some businesses need more than one or two pictures. If customers want to see your work before they hire you, a gallery lets you show it off.
WordPress has a gallery built in. You don’t need to install anything.
Open your Gallery page and click Add Media. On the left, click Create gallery.

Upload your photos. You can choose them all at once. When they’re finished uploading, they’ll all be checked.
This is a good time to click each photo and add its Alt Text. Then click Create a new gallery.

Gallery Settings
Before your gallery goes on the page, WordPress gives you a chance to arrange it.
You can drag the photos into whatever order you like. Put your best one first.
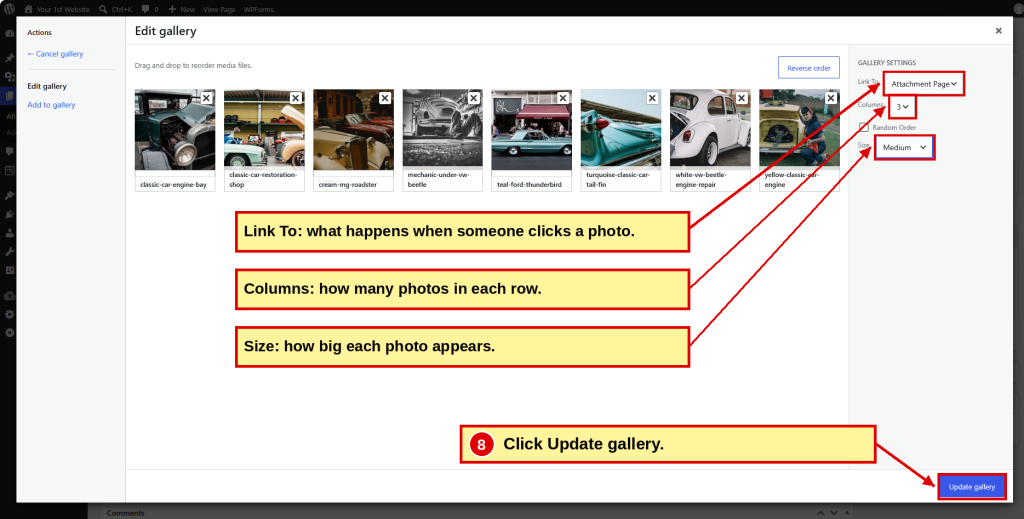
On the right, you’ll see a few settings:
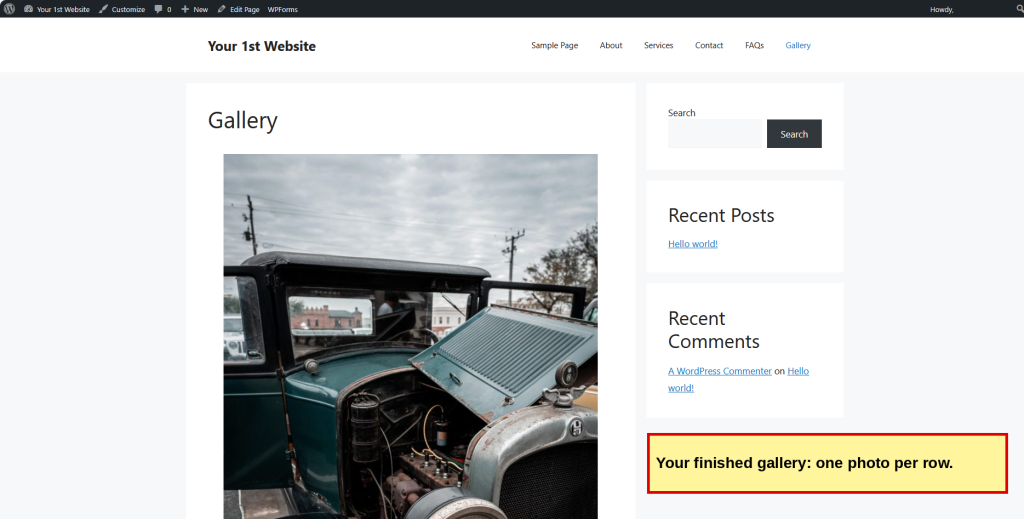
Columns decides how many photos sit side by side. Three columns shows a lot of photos at a glance, like a contact sheet. One column shows each photo large, one after another, like turning the pages of a photo album.
Size decides how big each photo appears. Smaller sizes work well with more columns. With one column, choose Large.
Link To decides what happens when someone clicks a photo. You can leave it as it is.
Which is better: lots of small photos or a few big ones? It depends on your work. A landscaper might want large photos so visitors can see the details. A bakery with dozens of cakes might want small photos so visitors can scan them quickly. Try both and see which one shows off your work better.
Changing It Later
Your gallery isn’t set in stone. Click the gallery on your page, then click the little pencil that appears. You’ll be right back in the gallery settings, where you can change the columns and size, rearrange the photos, remove one, or click Add to gallery to include new ones.
When you’re done, click Update gallery, then Update to save the page.
Don’t Overdo It
You don’t need fifty pictures. A gallery with eight great photos makes a better impression than one with fifty mediocre ones. Visitors notice the blurry, dark and crooked ones.
Start with your best work. Add more as you finish new jobs worth showing. A gallery that grows over time also shows visitors that your business is active.
Prefer the Down & Dirty Version?
Add Images
Our illustrated Down & Dirty guide walks you through adding images and building a gallery with numbered instructions, screenshots and checkboxes.
Coming Up: Menus
Your pages are built. Next, we’ll make sure visitors can find them by setting up your website’s menu.
| ← Previous Chapter 10 Create Contact Page |
Website Guide 101 Chapter 10 Images – Gallery |
Next → Chapter 11 Menus |
